

How To Install Blinds & Shades
HippoShades offers custom-made window treatments crafted to perfectly fit your space. Unsure about how to install your new shades after receiving the package? Need installation instructions for your blinds? Don't worry our detailed guide will walk you through every step. Just choose the type of shade you're interested in and follow along with our quick video tutorials or refer to our step-by-step written instructions!

Universal Step before Installation
Step 1: Gather Tools.
Most of our window coverings are designed for easy self-installation. The straightforward installation process allows you to quickly and effortlessly mount your blinds by following our detailed step-by-step guide.

Tools Needed for Shade Installation
- Pencil
- Level
- Steel Tape Measure
- Power Drill
- Screwdrivers
- Stepladder (if necessary)
Step 2: Verify Package Contents.
Carefully inspect the packaging and confirm that you have received
the correct quantity of screws, brackets, and all necessary components
included in your order before beginning the installation process.
Step 3: Confirm Mounting Location.
Pick the suitable installation location for inside or outside mounts
Installed within the window recess for a clean, streamlined look.
Ensure the top surface is level and that there is sufficient depth for
proper installation. Avoid installing inside mounts on frames with trim.
- Outside Mount:
Verify that there is adequate space between the window frame and the ceiling to accommodate the valance.
Roller Shade
Roller Shade Roller shades offer a sleek and modern solution for light control and privacy. Their minimalist design pairs perfectly with any decor, while a variety of fabric options allows you to customize light filtering or blackout features to suit your needs. Easy to operate and simple to install, roller shades are a versatile choice for any room.

Step 1 Mark Positions.
- Attach the brackets to the correct position on the shade and mark the screw locations on the wall or frame with a pencil.
- Remember to consult the product instructions for precise bracket placement.
- Duplicate the previous steps for the other brackets.
- Ensure the brackets are level by using a level tool.
Step 2 Install the Brackets.
- Drill pilot holes through the marked bracket positions using a power drill.
- Remove the brackets from the shades and securely screw them into the wall or frame.
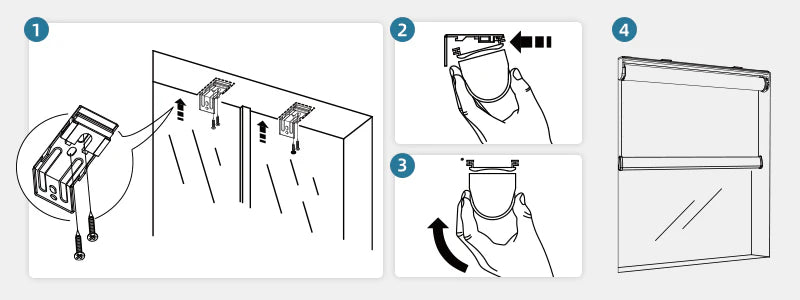
Step 3 Install the Shade.
- Hold the shade with both hands aligning the top edge with the bracket. Push the shade towards the bracket to engage the plastic tabs on the valance locking them into place on one side. Next tilt the shade upwards until the opposite side is caught by the bracket hooks ensuring the shade is firmly seated with an audible click.